« The vOICe for Windows
![]() « The vOICe Home Page
« The vOICe Home Page
« The vOICe for Windows
The
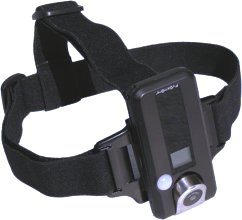
![]() FlyCamOne2 Micro Video Camera
can function as a webcam with an optional headband, the
FlyCamOne2 Micro Video Camera
can function as a webcam with an optional headband, the
![]() FCO2 Sportster HeadSet,
making it very easy for blind end users to create their own affordable augmented reality headset for The vOICe,
with a head-mounted webcam that can be readily connected to a netbook PC in a backpack via a single USB cable.
This page adds some details, instructions and suggestions for use of the FlyCamOne2 as a head-mounted
webcam for mobile use of The vOICe for Windows.
FCO2 Sportster HeadSet,
making it very easy for blind end users to create their own affordable augmented reality headset for The vOICe,
with a head-mounted webcam that can be readily connected to a netbook PC in a backpack via a single USB cable.
This page adds some details, instructions and suggestions for use of the FlyCamOne2 as a head-mounted
webcam for mobile use of The vOICe for Windows.
Properties
The FlyCamOne2 camera weighs only 37 gram, and measures 40 x 80 x 14 mm. Field of view (FOV) is approximately 50 degrees horizontal and 40 degrees vertical.
Installation
The FlyCamOne2 camera is delivered with a protective opaque sticker over the lens that must first be peeled off. For the webcam functionality a webcam driver is required. After unzipping and installing the driver executable "STK02N 2.0.exe" , you can use the mini-USB to USB cable that comes with the camera package to connect the FlyCamOne2 camera to your PC. At that point you can start The vOICe for Windows software and it will automatically recognize the camera and start sounding the live view in the 320 x 240 pixel video format that is supported by this camera (The vOICe's default choice of 176 x 144 pixels is not supported by the camera driver). An "Image Download Utility" window may pop up, saying that no images are stored in the camera, but there is no need to insert an SD card, and this popup window automatically closes after 15 seconds. (In case there is an SD card, the window may not disappear automatically unless you first delete any media files from the SD card. Alternatively, you can keep the "Image Download Utility" window from appearing altogether by running msconfig, unchecking the "Syntek Camera" item in the Startup tab, pressing OK, and finally rebooting.) You can leave the camera's on/off slider switch in the off position and webcam functionality will still be available, so you need not worry about that either.
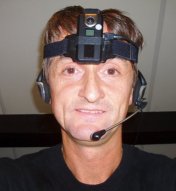 Camera headband and audio headset
The optional headband, the FCO2 Sportster HeadSet, arrives packed within a little bag resembling a children's sock. The headband itself consists of elastic straps that fit fairly comfortably around and over the top of the head. The straps are adjustable. Also inside the "sock" are two rubber bands of slightly different sizes. One of the rubber bands, preferably the smaller one for a tighter camera mount, can be slid through two small openings in the headband's plastic base plate such that it locks into stretched horizontal position, flat against the base place, and the camera can then simply be squeezed tightly underneath the rubber band. This very simple mounting mechanism functions well and is mechanically quite stable.
Alternatively, you can mount the camera using the straps of Velcro that come with the FlyCamOne2 package. The Velcro option also lets you mount the camera on for instance a hat or billed cap.
While wearing the camera upright on the headband, the mini-USB connector is on the left side of the camera, and thus easily runs from the camera around your head to, say, a small netbook PC inside your backpack. The USB cable that comes with the camera may be just long enough, and if not you can add a regular USB extension cable.
You can easily wear most stereo headphones, or an audio headset with a microphone boom, on top of the camera head-mount, without causing mechanical conflicts.
Mount the camera upside-down?
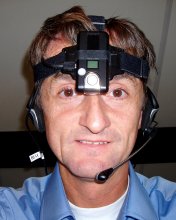
 It is advisable to wear the camera mounted upside-down under the rubber band. The advantages
of wearing the camera upside down are twofold: first, it lets you wear the camera closer to
eye level for the most natural viewpoint, and second, it lets you tilt the movable camera
head forward to look down on for instance a table top without having to bend over. Of course
something must then be done to again get an upright image from the now upside-down camera.
It is advisable to wear the camera mounted upside-down under the rubber band. The advantages
of wearing the camera upside down are twofold: first, it lets you wear the camera closer to
eye level for the most natural viewpoint, and second, it lets you tilt the movable camera
head forward to look down on for instance a table top without having to bend over. Of course
something must then be done to again get an upright image from the now upside-down camera.
One method is to disconnect the FlyCamOne2 from the computer, slide the on/off slider switch on the side of the camera to the "on" position" (closest to the camera head), and press the shutter button that sits next to the on/off slider switch. The 2-digit LCD display with read "Ry" for "ready", and the shutter button acts as a toggle: each time that you press it, the "Ry" will show either upright or upside-down, reflecting how the camera view will appear once connected to the PC. Next, connect the camera to the PC again, start The vOICe, and move the on/off slider switch on the FlyCamOne2 back to the off position. Blind users will need sighted assistence with the procedure because reading the "Ry" on the LCD screen is inaccessible, or else they can apply a bit of trial-and-error and verify the result afterward with a known reference view to know if the camera view is upright as intended, and if not repeat the above procedure until the camera view is upright. However, it seems that the procedure must be repeated every time that the camera is reconnected, making it rather inconvenient.
Alternatively therefore, to compensate for a 180 degree rotated (upside-down) camera view in The vOICe for Windows, you can also go to the menu Edit | Window Preferences, and select a video frame rotation of 180 degrees instead of the default 0 degrees. The processed camera view will then be upright again, but saved unprocessed snapshots (through Control S) will still be upside-down. The vOICe's view rotation setting is preserved across runs.
Please mind your own safety and that of others in creating and using a mobile setup for The vOICe, and carefully read the safety guidelines and disclaimers for The vOICe for Windows. A mobile setup should only be used in a safe and known home environment or equivalent, and with professional O&M training and supervision where applicable, allowing you to "learn to see" in line with the intended educational uses of The vOICe.
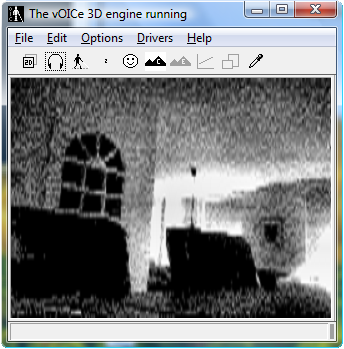
View quality
The image quality of the FlyCamOne2 is reasonable for a CMOS sensor, and good enough for indoor use at night under incandescent light conditions, but there is noticeable image noise that can make the soundscapes appear "grainy". If you wish, you can effectively suppress this by toggling key 'N' for a much smoother appearance with The vOICe's image noise filter (demo: click link and move mouse over image).
Troubleshooting
Normally, the FlyCamOne2 will after the above-described webcam driver installation work right away as a webcam when connected to the PC via the USB cable, and it will be listed in Device Manager as "Standard Camera" (Control Panel | System | Hardware tab | Device Manager button | Imaging devices, and expand this device category). The 2-digit LCD screen of the FlyCamOne2 will then read "WC", for "WebCam". However, it can happen that the FlyCamOne2 inadvertently runs in "PC" mode, where it appears to the PC as a USB drive (an empty drive in case no SD card is present). In that case the FlyCamOne2 will not function as a webcam under Microsoft Windows. Now the FlyCamOne2 has many operating modes, with 2-character labels such as "MF" (Memory Full), "VE" (Video Endless recording), "SE" (Spy video Endless), "PC" (PC in drive mode), "WC" (WebCam mode, which is what we want), "dL" (deLete mode), "99" (battery status). Fortunately though, only the "PC" mode is incompatible with webcam operation, such that a blind user can in practice solve the problem independently despite the inaccessible LCD screen of the FlyCamOne2, by randomly picking a FlyCamOne2 mode, with a high probability of not picking the unwanted "PC" drive mode. The recipe for this is as follows:
Conclusion
 When opting for the FlyCamOne2 camera with its optional headband, a small netbook PC running
inside a backpack, and a stereo headset with microphone boom, you can with little effort have
a decent wearable starter setup for under $500! The main compromise is visual appearance
of the head-mounted camera, which is clearly much less elegant than unobtrusive
camera glasses with a hidden camera.
When opting for the FlyCamOne2 camera with its optional headband, a small netbook PC running
inside a backpack, and a stereo headset with microphone boom, you can with little effort have
a decent wearable starter setup for under $500! The main compromise is visual appearance
of the head-mounted camera, which is clearly much less elegant than unobtrusive
camera glasses with a hidden camera.